| 1. |
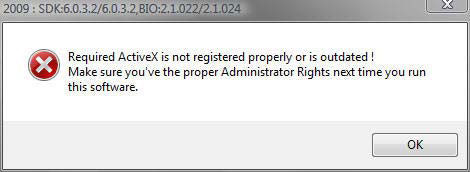
The message “Required ActiveX is not registered…,” (as shown below) appeared
when I run the TCMS V2.2 software. What could be causing it and what could I
do to solve it? |
| |
|
| |
 |
| |
|
| |
An old copy of the software installed in your system is causing this problem. To solve this
problem, you need to identify your platform and follow the instructions closely. |
| |
|
| |
| a. |
Please uninstall the TCMS V2.1.2 and the TCMS V2.2 software. This is very important to
make sure that the system is free from any copy of TCMS. |
| b. |
Delete the old TCMS V2 folder of TCMS V2.1.2 (old version) |
| c. |
Now you are ready to install the TCMS V2.2 (new version) again. |
|
| |
|
| |
For Windows Vista Platform, |
| |
|
| |
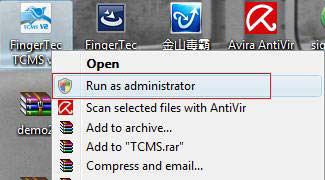
| d. |
You have to be an administrator when you open the software. To select this, first you have
to right click the TCMS V2 icon and select “Run as administrator). |
|
| |
|
| |
 |
| |
|
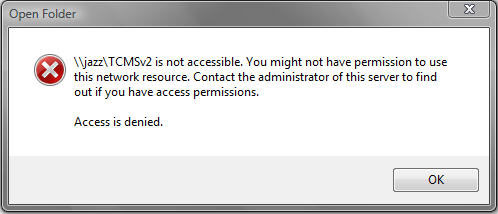
| 2. |
We share the TCMS V2 folder with full permission. However when we run the
software from a remote PC, the below error message appeared. How to solve this
problem? |
| |
|
| |
| a. |
This should take a second to solve. Go to TCMS V2 Properties. In Security tab you need
to choose “Everyone” group. When you select “Everyone” you will be granted full
permission to access the software. |
| |
|
| |
 |
|
| |
|
| |
| b. |
However, if you couldn’t find “Everyone” group, click edit>add>advanced>find now.
Then select “Everyone” and click the “OK” button. |
| |
|
| |
 |
|
| |
|
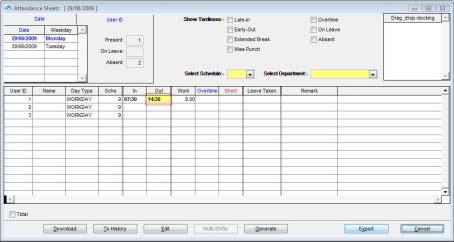
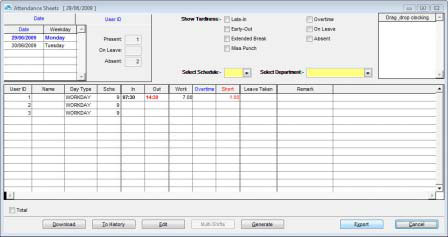
| 3. |
Every time when we edit the attendance sheet, the “OUT” column will turn
yellow. Why the change of color? |
| |
|
| |
 |
| |
|
| |
The yellow represents an excused clocking. For example, a user OUT time is 15:30 but the
user goes back at 14:30 with a good excuse and the system shows a short of 1 hour. Any
modification done on this data or when you double click the OUT column, the column will
turn yellow and the short time disappears. |
| |
|
| |
It is possible to change the column back to its original data complete with red indicating
lateness and short period. Click edit and double click the OUT column followed by clicking
the “Apply” button. |
| |
|
| |
 |
| |
|
| 4. |
Currently I’m using TCMS V2.1.2. How to upgrade the software to the TCMS
V2.2? FingerTec Worldwide has just launched the new version of TCMS V2,
known as TCMS V2.2. To upgrade your copy, you need to do the followings: |
| |
|
| |
| a. |
Backup the existing database. |
| b. |
Uninstall the TCMS V2.1.2 and delete the TCMS V2 folder. |
| c. |
Download the TCMS V2.2 at http://user.fingertec.com/user-download.htm |
| d. |
Extract the file. |
| e. |
Install the TCMS V2.2. |
| f. |
Perform terminal activation. |
| g. |
Restore the backup database. |
|
| |
|
| |
TCMS V2.2 will be available with better features and great interface. |
| |
|
| 5. |
When I tried to download clocking data from the USB flash disk to the TCMS V2
software, the system prompted “error 169” message. What are causing this
message to appear and what is the solution? |
| |
|
| |
Do these 3 simple checklist: |
| |
|
| |
| 1 |
Have you done terminal activation? |
| |
Download of clocking data is not possible without activation. |
| |
|
| 2 |
Is configuration of the terminal ID exactly the same as the device number? |
| |
To check the device number, follow this instruction: |
| |
Press Menu>Option>Comm. Option>Dev. Number). |
| |
|
| 3. |
Have the connection in the device is setup been set to USB connection? |
| |
If not, please do so. |
|
| |
|
| |
Once you have done the 3 check list but the message still appears, you need to provide the
backup database of your USB flash drive file and send it to support@fingertec.com for
checking. |
| |
|
| 6. |
What is the maximum distance allowed for installation of R2 and R2i? |
| |
|
| |
R2 is a master reader and R2i is a slave. To get optimum working environment for both
readers, the maximum distance in between them must be 3 meters. Any longer than 3 meters
will disrupt readings of fingerprint or the RFID card verification because signal between R2
& R2i will be unstable or lost. |
| |
|
| 7. |
We lost the software CD. Is there any way we can download the TCMS V2
software and retrieve the product and activation key? |
| |
|
| |
You don’t need to worry because FingerTec Worldwide has all the records intact. However,
to retrieve the relevant information, we need you to provide us the serial number of the
machine. |
| |
|
| |
To check the serial number, press Menu>System info>Device info>Serial number.
After you have obtained the serial number, email us the information including the model
name and the matching serial number. We will respond within 24 hours. In the meantime,
kindly download your copy of TCMS V2.2 at http://user.fingertec.com/user-download.htm |
| |
|
| 8. |
We want to transfer the TCMS V2 software that we have installed at our PC to the
new PC. How to do that? |
| |
| |
|
| a. |
Copy the “FingerTec worldwide” folder at the program file located in your existing PC. |
| b. |
Paste the “FingerTec Worldwide” folder at the program file in your new PC. |
| c. |
Install the TCMS V2.2 at the TCMS V2 folder. |
|
| |
|
| 9. |
When double clicked the backup/restore database, the error message below
prompted. What should I do? |
| |
|
| |
 |
| |
|
| |
Please close the entire menu in the TCMS V2, then double click at backup/restore database
again. |
| |
|
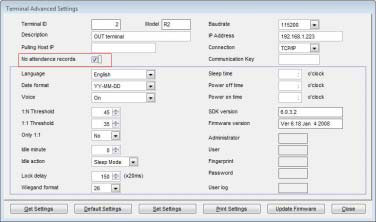
| 10. |
We have two terminals. We want to use one as time attendance terminal and
another one as door access terminal. We don’t want the transactions from the
door access terminal to appear in the attendance sheet. It is possible to do that? |
| |
|
| |
Yes. Please go to the setup Fingertec terminal under devices. Select the terminal for door
access terminal. Click the advanced setting button, check “no attendance records” as
shown below. |
| |
|
| |
 |
| |
|
| |
The transactions of the door access unit will not appear in the attendance sheet after you have
checked the “no attendance records”. The transactions however will appear at the terminal
data audit list and in the staff movement analysis reports. |
| |
|
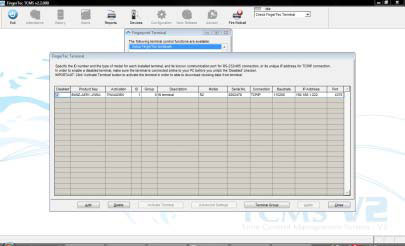
| 11. |
When we opened the software, all of the icons were disabled except for Exit,
Reports, Devices and Fire Roll icons. What happened and how can we solve
this? |
| |
|
| |
 |
| |
|
| |
When there are no connection between your PC and the terminal, the other icons will be
disabled. If you are using the TCP/IP, RS232 and RS485 connection, the PC and terminal
must be connected in order to run the software. |
| |
|
| |
| a. |
Please uncheck the disable and click on the “OK” button. |
| b. |
If “Process complete” message appears, please click the “Apply” button. After that you
may use the software as usual. |
| c. |
If “Error 169” message appears, please check the connection between the terminal and
PC. |
| d. |
To check the connection between terminal and PC, follow the instructions below: |
| |
| I. |
Please go to start button>run>cmd. |
| II. |
Ping the terminal IP address. e.g. (ping 192.168.1.222) |
| III. |
If there is no connection, please check the terminal IP address. |
| IV. |
If there is connection, please make sure that the ID that you configure in TCMS V2
must be same with the device number that you set in the terminal. (Press
Menu>Option>Comm. option>Device number). |
|
|
| |
|
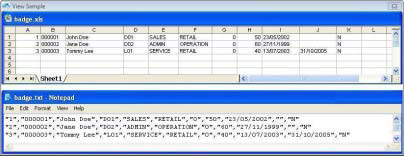
| 12. |
What is the format to import users from text file or excel in Users and what is
the maximum field for each field? |
| |
|
| |
Please refer to the below diagrams for the sample of the format: |
| |
|
| |
 |
| |
|
| |
The maximum field for: |
| |
|
| |
| User ID: |
9 |
| Name: |
40 |
| Emp No: |
14 |
| Department: |
30 |
| Section: |
30 |
| Group: |
3 |
| Rate/Hr: |
8 |
|
| |
|
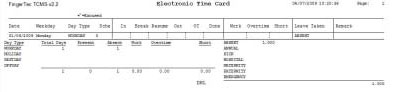
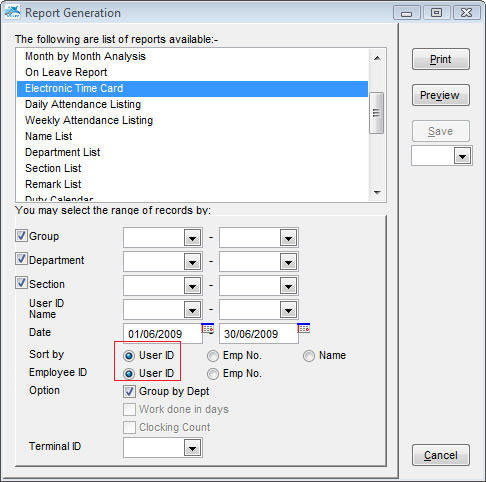
| 13. |
The electronic time card reports appear as below. We have selected the date
range from01/06/09 to 30/06/09 but the reports appear for one day only. What
could be causing this outcome and how to solve it? |
| |
|
| |
 |
| |
|
| |
This happens because you did not select certain required fields. Please make sure that you
select the “user ID” radio buttons for “Sort by” and “Employee ID” fields first before
you proceed. |
| |
|
| |
 |
| |
|
| 14. |
We want to set multiple schedules in the group duty roster but we only found
one schedule available. |
| |
|
| |
 |
| |
|
| |
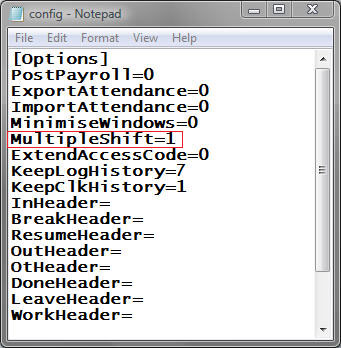
If you are using the TCMS version v2.1.2s and below, please enable the multiple shift in
the config file at the TCMSv2 folder as shown below. Please change “0” to “1” to enable
the multiple shift, and don’t forget to save the changes. Restart the TCMSv2 after
changes are made. |
| |
|
| |
You will find the 3 schedules for the multiple shifts at group duty roster A to Z in the
auto schedule. |
| |
|
| |
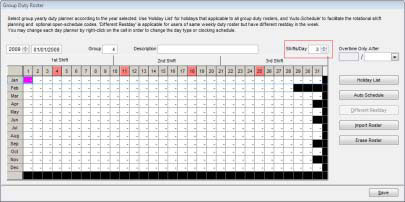
If you are using TCMS V2.2 version, please make sure that you change shift/day to 3 in
the shift group duty roster: |
| |
|
| |
 |
| |
|
| 15. |
The advanced menu in the TA100 is missing. We are using admin fingerprint to
enter the menu. |
| |
|
| |
You are required to have supervisor fingerprint or password to enter the advanced option
menu because only supervisor (highest privilege) can enter the advanced option menu.
You may not be able to see the advanced option menu if you use the admin or enroller
fingerprint to enter the menu. |