| FingerTec® Terminal with GPRS and Web Server | ||||||||||
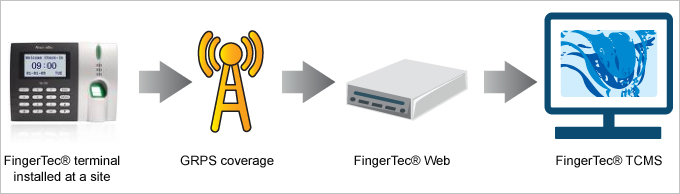
| The integration of GPRS technology allows FingerTec® terminals to work as “mobile time capturing station”. Terminals can be installed in any location even in places without Internet access. FingerTec® terminals only requires GPRS coverage to interact with FingerTec Web Server. Therefore, all you need to do is to check the GPRS coverage of the location and make sure it is ready to be installed with FingerTec® GPRS terminals. | ||||||||||
| The Conceptual Communication Diagram | ||||||||||
 |
||||||||||
|
||||||||||
| The status of GPRS connection between FingerTec® terminal and FingerTec® Web Server is shown by | ||||||||||
|
||||||||||
| In case of GPRS connection is unavailable, you can connect the FingerTec® terminal to Internet connection. The FingerTec® will use Internet connection as a substitution for all operations. You will see | ||||||||||
|
||||||||||
| The Communication & Data Transfer | ||||||||||
| Step 1 – To install and activate GPRS connection | ||||||||||
| Installation of FingerTec® terminals in a site is similar to normal installation. The only addition is the GSM/GPRS SIM card. You must apply a GSM/GPRS SIM card from your local service provider, and make sure it is activated with GPRS feature. | ||||||||||
 |
||||||||||
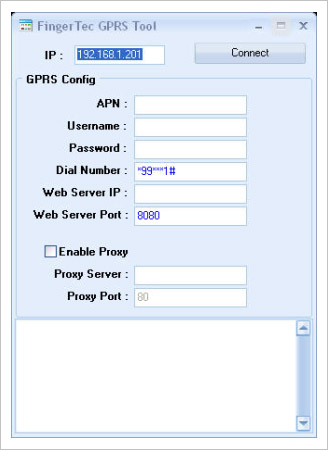
| You must configure the FingerTec® terminal after inserting the GSM/GPRS SIM card. FingerTec® provides the tool for you to configure the GPRS connection. This is the information required to configure the GPRS connection in FingerTec® terminal (details explanation on each data field is explained in the GPRS setup manual). | ||||||||||
 |
||||||||||
| Step 2 – To install FingerTec® Web Server | ||||||||||
| In headquarters, a dedicated PC is required as FingerTec® Web Server. The FingerTec® Web Server requires a fixed IP address to connect to WAN (Wide Area Network). The FingerTec® Web Server communicates with FingerTec® terminals via GPRS. | ||||||||||
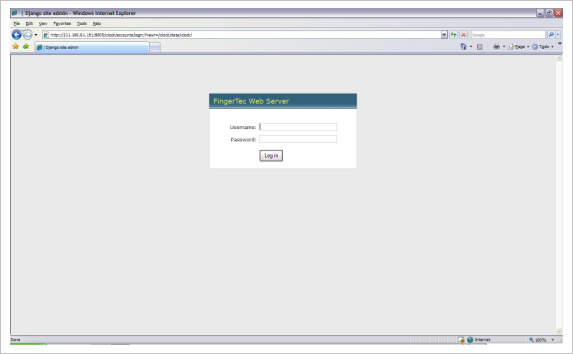
| Step 3 – Start to run FingerTec® Web Server | ||||||||||
| The FingerTec® Web Server must run to connect to FingerTec® terminals to retrieve information. The FingerTec® Web Server is protected by password. | ||||||||||
 |
||||||||||
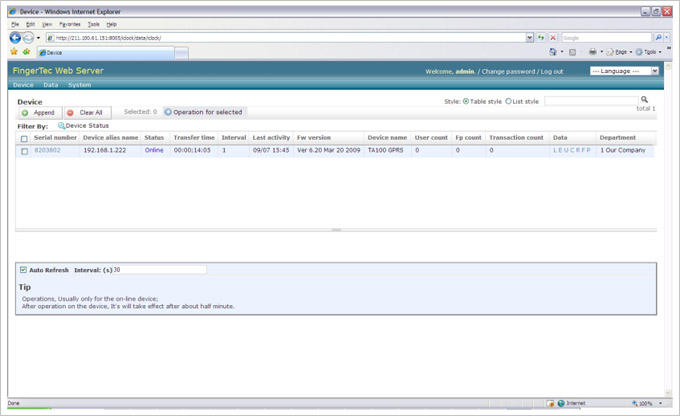
| When the GPRS connection is established, you can see the details of FingerTec® terminal as below. | ||||||||||
 |
||||||||||
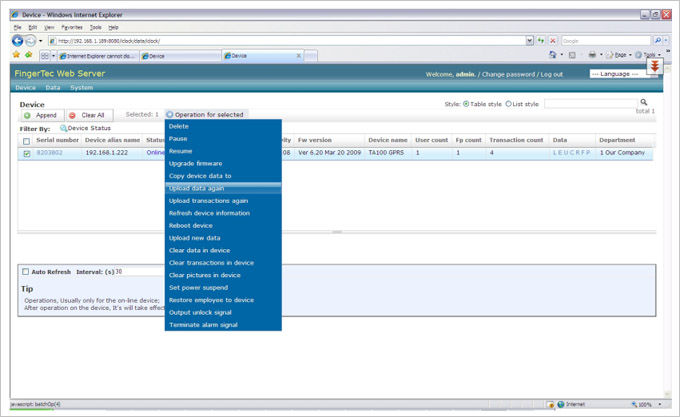
| You will see all information of FingerTec® terminal be displayed on screen. You can check the total of users, fingerprints, transaction logs etc stored in the FingerTec® terminal. You can manage and check all FingerTec® terminals in FingerTec® Web Server. All operation are done online and immediate effect to the FingerTec® terminals. |
||||||||||
 |
||||||||||
| You can check any activities at any FingerTec® terminal, such as terminal is power on/off, enrolment of users, administrator login into system etc. All activities are recorded by date and time for reference. | ||||||||||
| Step 4 – Enrolment and Verification at FingerTec® terminal | ||||||||||
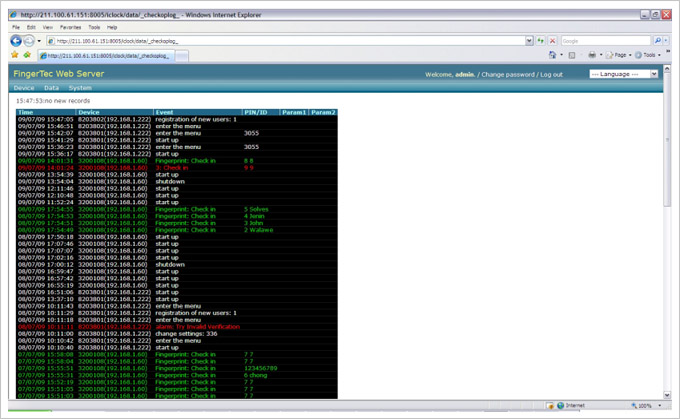
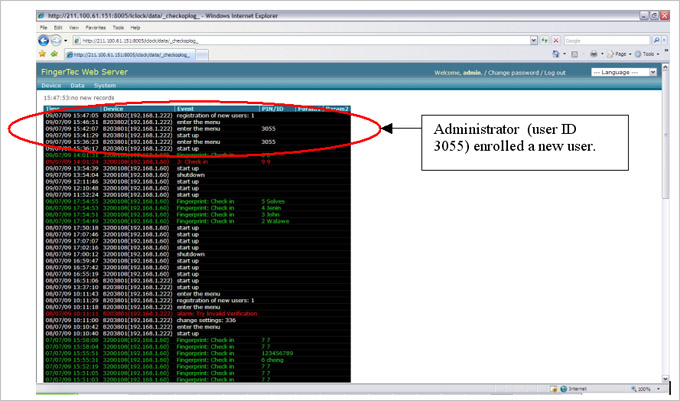
After the configuration, you can start to enroll users into the FingerTec® terminals. During enrolment, user enrolls fingerprint, password or card at the FingerTec® terminal. His/her information (user ID, fingerprint, password, card ID) be stored in local memory of FingerTec® terminal. The enrolment information (user ID, card ID) will be sent to FingerTec® Web Server via GPRS and viewed in FingerTec® Web Server. This is to inform administrator a new user has been enrolled into a FingerTec® terminal. Check below. |
||||||||||
 |
||||||||||
| It shows the administrator (showed by User ID) who enrolled the new user. | ||||||||||
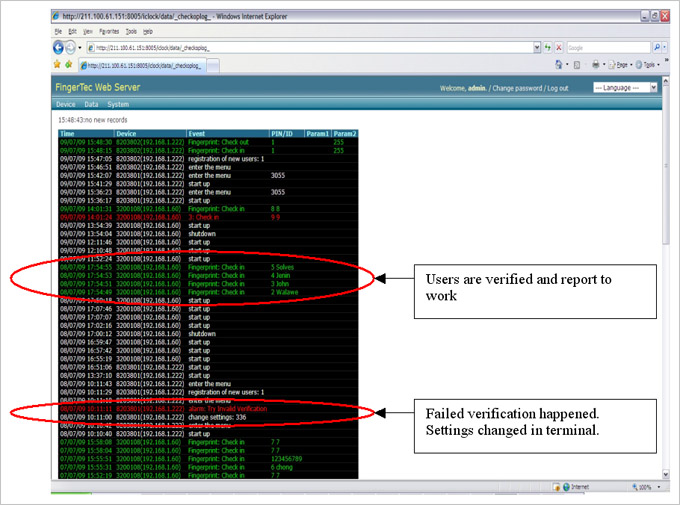
Result of verification are kept in local memory of FingerTec® terminal. FingerTec® terminal sends the result of verification (or transaction log) to FingerTec® Web Server immediately (similar to the enrollment process). Administrator can always check who is the user report attendance, and what time the user is reporting for attendance. The data transfer is in real time right after verification is completed at FingerTec® terminals. Therefore administrator can always receive the latest transaction logs for evaluation. If the verification is failed (improper verification or trail error), FingerTec® terminal will send the information to FingerTec® Web Server to alert the administrator to check the terminal. Any changes done to the internal settings of FingerTec® terminals are recorded and send to FingerTec® Web Server for review. This is to secure the terminal from any improper or unauthorized settings. |
||||||||||
 |
||||||||||
| Step 5 – Management in FingerTec® Web Server | ||||||||||
| The FingerTec® Web Server allows you to download and upload users between all connected FingerTec® terminals. The users do not need to re-enroll if they are shifted to a new working location. | ||||||||||
 |
||||||||||
| There are total 17 types of operations can be done to the terminal. | ||||||||||
| Step 6 – Data analysis in HQ by FingerTec® TCMS V2 | ||||||||||
All data sent from FingerTec® terminals into FingerTec® Web Server will be saved into MySQL database directly. However, these transaction logs (already sent to FingerTec® Web Server) remains in the FingerTec® terminals. The FingerTec® Web Server is not designed to produce any time attendance calculations or reports. You will need to use FingerTec® TCMS V2 to connect to the MySQL database and to download all transaction logs. |
||||||||||
|
||||||||||
| Step 7 – Data Analysis in Local by FingerTec® TCMS V2 | ||||||||||
| Under certain scenario, local administrator in site is granted permission to check attendance of users. Therefore a TCMS V2 is installed in a PC for the local administrator. Local administrator can connect to the terminal via TCP/IP, RS232, RS485 or USB pen drive to download transaction logs. These logs are generated into attendance data for analysis. This is a fast method for local administrator to monitor attendance of users. | ||||||||||