| |
| New features of FingerTec® TCMS V2.2.005 |
| |
| |
| The new TCMS V2.2.005 is bundled with 4 new features, which are: |
| 1. |
Calculation of extra time |
| 2. |
Report Wizard |
| 3. |
Additional “Present” column during export attendance |
| 4. |
Selections of data to restore during restore database process. |
|
| |
| 1. Calculations of extra time |
| The new TCMS V2.2 is now loaded with new feature to comply with Portugal’s new labour law. In the new labour law of Portugal, overtime is considered as extra time. The overtime of employee is not grouped under OT column, but into a new column called ET column (extra time), and employers do not need to pay extra to the employee even if they worked extra time.
The accumulated extra time in turn is considered as total leaves available for employees. When he/she applies for a one-day leave for example, 8 hours will be deducted from the accumulated ET.
To apply this new feature, you must upgrade your TCMS V2 to TCMS v2.2.005. And do the followings: |
| |
| Step 1 |
| Turn the local settings of PC and language of TCMS V2 to Portuguese (Portugal). |
|
| |
| Step 2 |
|
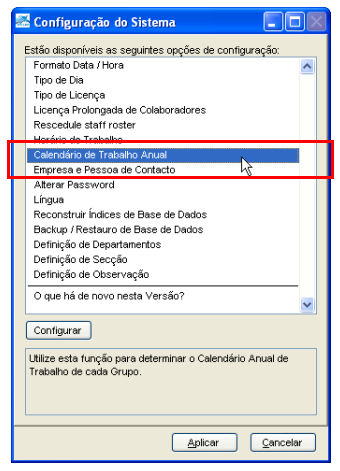 |
Select Group Duty Roster from Configuration. |
|
| |
| Step 3 |
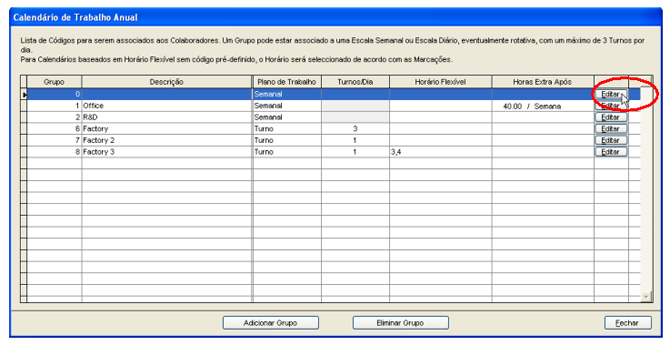 |
| Select the Group to apply with ET. Click Edit to proceed. |
|
| |
Step 4 |
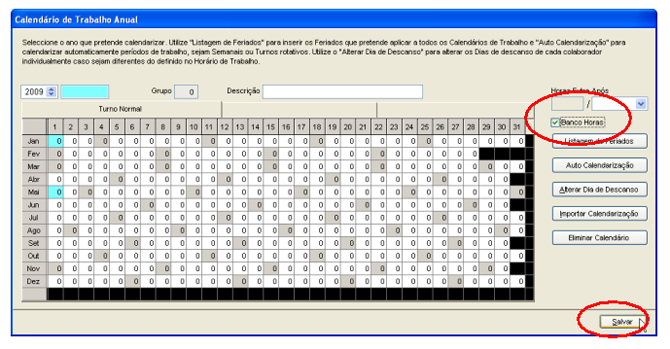 |
| Tick at the box “Extra Time” to enable the feature. Click Save to save settings. |
|
| |
Step 5 |
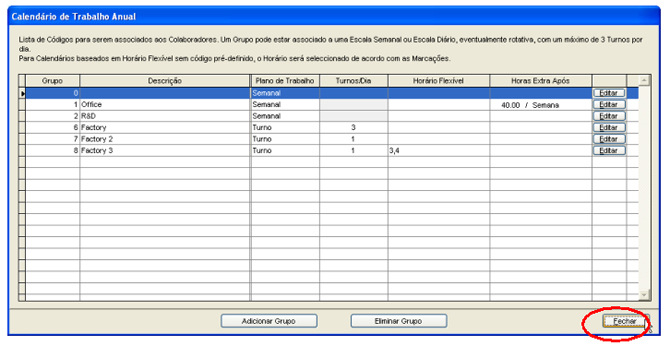 |
| Click Close to end the settings. |
|
| |
Step 6 |
|
 |
Click Apply to save settings. |
|
| |
Step 7 |
 |
| Click Attendance to open Attendance Sheet. |
|
| |
Step 8 |
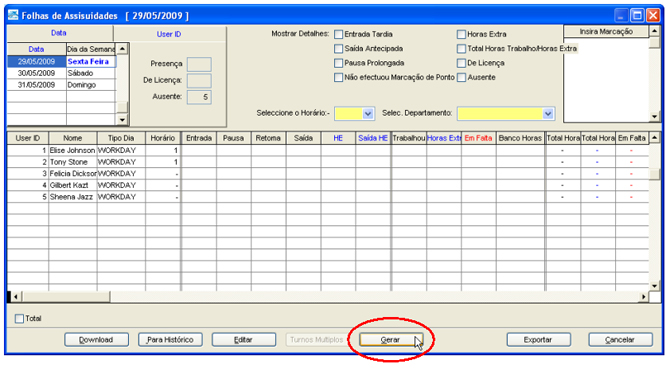 |
| Click Generate to start generating attendance records according to the new settings. |
|
| |
Step 9 |
|
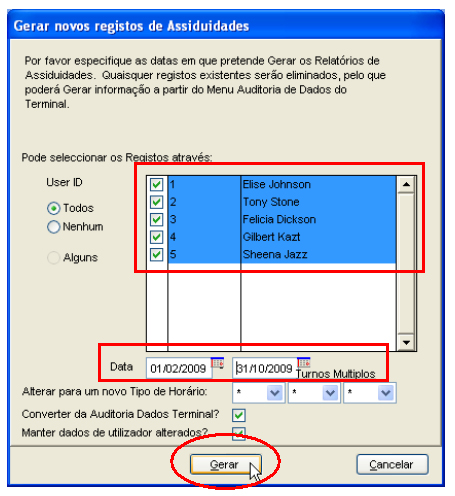 |
Select the user ID applicable to the new settings.
Define the date range to start these new settings.
Click Generate to start process. |
|
| |
Step 10 |
 |
| A new column “Extra Time” will be displayed on the attendance sheet. The value equals to ET column accumulated everyday. |
|
| |
| Step 11 |
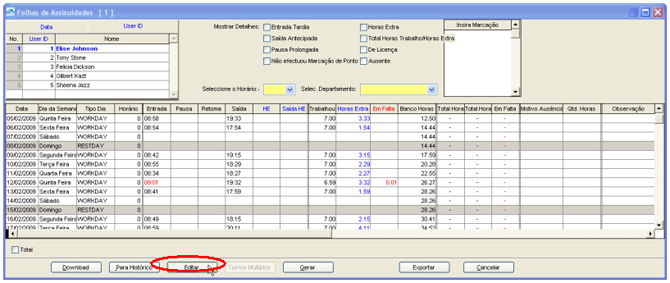 |
If employee applied for leave for example Emergency leave for 1 day (7 hours), the administrator must deduct from his/her accumulated ET. Click Edit. |
|
| |
| Step 12 |
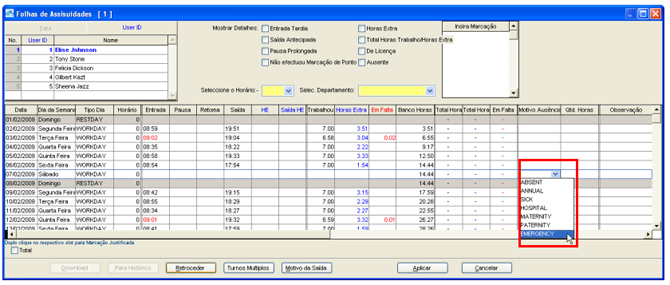 |
In the Leave Type column, select leave for example Emergency. |
|
| |
| Step 13 |
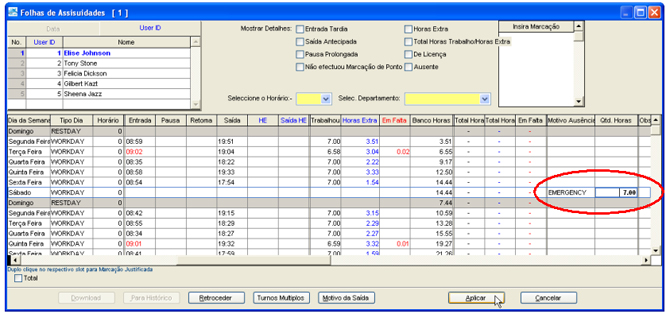 |
In the Quantity of Time, insert the total hours of the leave i.e. 7 hours.
Click Apply to save settings. |
|
| |
| Step 14 |
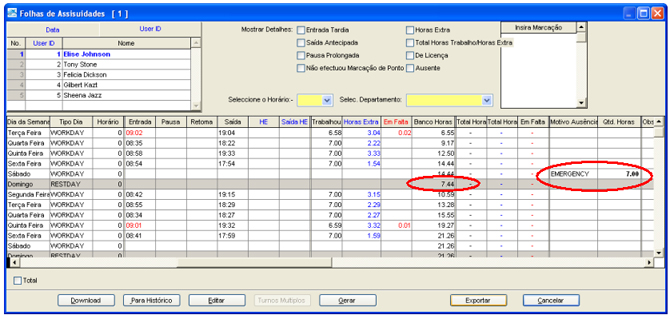 |
Software will deduct 7 hours from the accumulated ET time (14 hours 44 minutes) to become 7 hours 44 minutes. |
|
| |
| 2. Report Wizard |
| The new version provides a new function called Report Wizard. Software expert can customise unique report from the software by using the Report Wizard. You must have strong technical knowledge of crystal report before you can run Report Wizard. Therefore, this feature is made hidden during normal software operation. You can enable it by the followings steps: |
| |
| Step 1 |
 |
Explore into the TCMS V2 folder to seek for CONFIG.ini file. |
|
| |
| Step 2 |
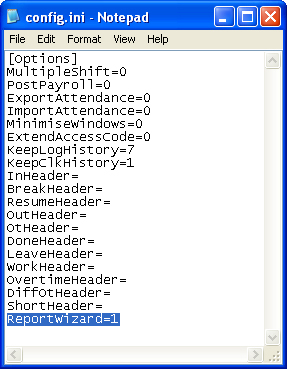 |
Seek for the line “Report Wizard”. Change “0” (zero) to “1” (one) to enable the feature. |
|
| |
| Step 3 |
 |
Save the CONFIG.ini and start to run TCMS V2. |
|
| |
| Step 4 |
 |
Click Report. |
|
| |
| Step 5 |
|
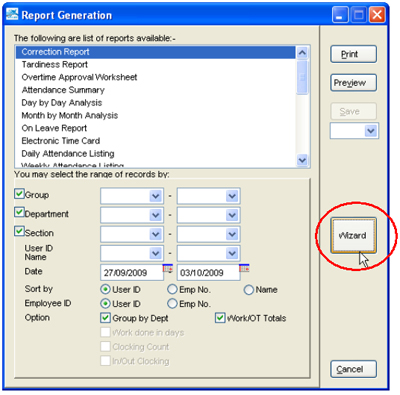 |
Click Wizard to start to run Report Wizard. |
|
| |
| 3. Additional “Present” column during export attendance. |
| In the previous TCMS v2, the total working days are calculated as below: |
| [Total working days = (Total working hours done) / Total required working hours in a day] |
| |
| For example: |
|
| Total working hours done |
= 149 hours |
Total required working hours in a day |
= 8 hours per day |
| Total working days |
= 149 hours / 8 hours per day |
| |
= 18.625 days |
|
| |
However the employee is working for 19 days, if we are using physical count. In certain software or payroll, the system would like to have the working days by physical count, instead of the above calculation.
In the new version, TCMS V2 comes with a new column during Export Summary. Do the followings. |
| |
| Step 1 |
 |
Click Attendance icon. |
|
| |
| Step 2 |
 |
Click Export. |
|
| |
| Step 3 |
|
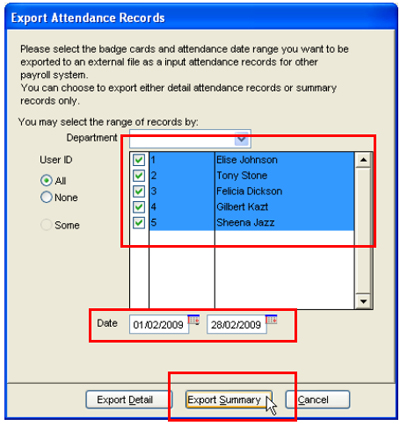 |
Select the corresponding users to export and date range. Click Export Summary. |
|
| |
| Step 4 |
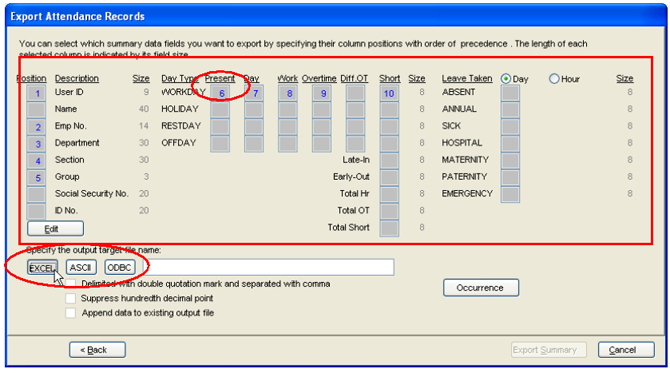 |
Define the sequences and length of required data fields. There is a new column called “Present”, to calculate working days physically. Select the type of export file. |
|
| |
| Step 5 |
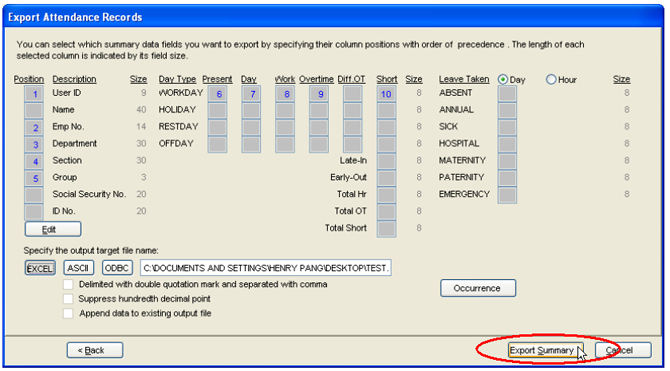 |
Now click Export Summary to export the file. |
|
| |
| Step 6 |
 |
Check into the exported file, under column “wcnt” (physical count present working days) and the value is 19. While in the column “wday” (working days by calculations) is 18.74 days. |
|
| |
| 4. To select data to restore during restore database process. |
|
In the previous version of TCMS v2, “restore database” will clear the current contents of software database, and replace them with the contents from ZIP file. Under this scenario, some important information will be cleared off i.e. user details, transaction logs, clocking settings and etc.
In the new version, you can select the types of data to restore into your software i.e. user information only, fingerprints only, transaction logs only and etc. Therefore you will have no worries if any data missing after the restoration process.
Follow steps below during restore process: |
| |
| Step 1 |
|
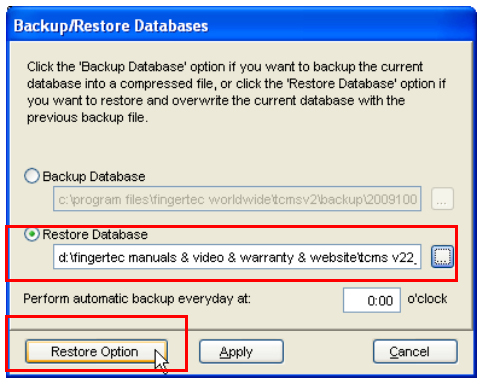
You must select “Restore Database” and select the database ZIP file.
Click Restore Option to select the types of data to restore. (Or click Apply if you wished to restore all data from the database ZIP file) |
|
| |
| Step 2 |
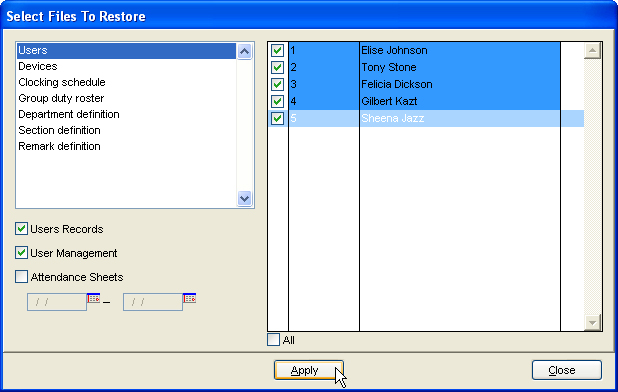 |
Select the types of data to restore. Click Select to start the restoration. |
|
| |
| Step 3 |
|
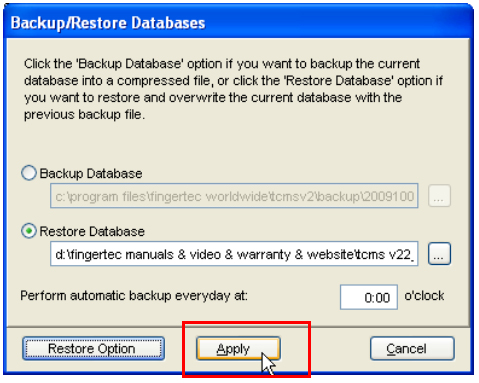
Click Apply to restore database. |
|
| |
| Settings of Entry-Exit Terminal |
If you install both R2 and R2i or Kadex and i-Kadex as entry and exit reader, we recommend that you install master terminals (R2 or Kadex) inside a premise and slave terminals (R2i or I-Kadex) outside the premise. This is to avoid vandalism on your master terminal, which holds all the information and costly than the slave terminal. This installation also can avoid unauthorised person to meddle with the reader and its internal configurations.
With the entry and exit installation, Entry-Exit Report is available. This report allows checking of the comings and goings of every user who is using the terminal.
Do the followings in TCMS v2 to configure Entry-Exit terminals: |
| Step 1 |
|
Click Devices icon. |
|
| |
| Step 2 |
|
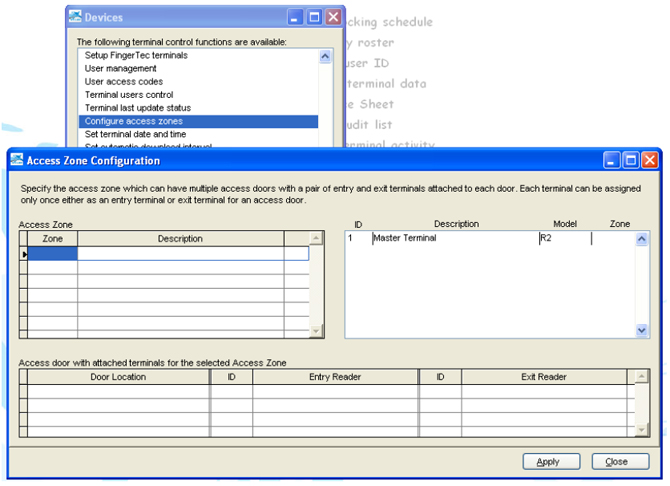
Select “Configure Access Zone” and a new window will pop up. |
|
| |
| Step 3 |
|
Under Access Zone table, insert the name of the zone i.e. Engineering lab.
Now name the door location (there could be multiple doors within a zone) i.e. Main Door.
In the Exit Reader column, select the Terminal ID of the master terminal i.e. 1 – Master Terminal.
Ignore the Entry Reader column, where software will consider the Slave terminal is installed as Entry reader automatically.
Click Apply to save settings. |
|
| |
| Step 4 |
|
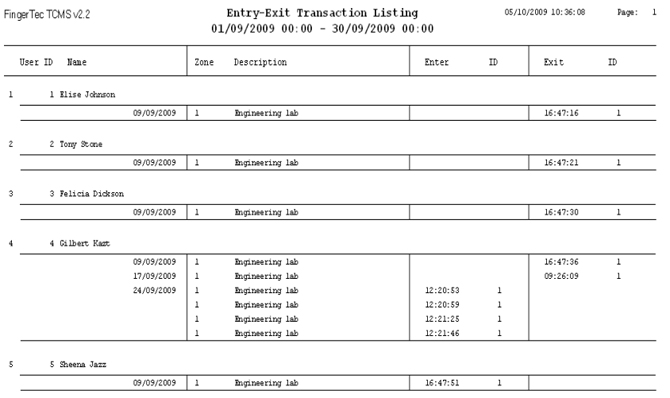
Under Report section, select Entry-Exit Transaction Listing to preview the report.
Software will allocate all transaction logs from Master terminal into the Exit column, while those from slave terminal into the Entry column. Installation of Master Terminal outside of a premise and Slave Terminal inside would not pose any complications. However, to do this, you need to do configurations as below. |
 |
Select the Entry Reader as master terminal i.e. 1 – Master terminal. Click Apply to save settings.
Now you are ready to generate the reports. |
|